· 9 min read
Safety Inspection Checklist for UK Fleets That Passes DVSA
DVSA-aligned safety inspection checklist for UK fleets with itemised checks, ISO-week planning, retention and downloadable template.
A DVSA visit rarely turns on whether a workshop can produce a blank form. It turns on whether the operator can show a controlled chain from the driver's walkaround, through the reported defect, to the safety inspection, repair decision, brake evidence and signed record. If the file contains vague ticks, missing dates or unexplained gaps, a confident verbal explanation won't repair the weakness.
A useful safety inspection checklist is therefore more than a workshop prompt. It's the working evidence behind the operator licence undertaking to keep vehicles fit and serviceable. It must work for the driver completing a daily check, the fitter carrying out a scheduled inspection, the transport manager reviewing exceptions and the compliance team assembling an audit pack.
The practical standard is simple. Someone who wasn't present should be able to understand what vehicle was checked, when it was checked, what the inspector found, what action followed and who authorised the vehicle's return to service. That standard applies across HGVs, trailers, vans and PSVs, although the actual inspection scope must reflect the vehicle and its operation.
Table of Contents
- Introduction to the Safety Inspection Checklist as a Compliance Control
- Legal Requirements Guidance and Best Practice Behind the Checklist
- Safety Inspection Checklist Categories at a Glance
- Detailed Checklist Entries With What to Check and How to Record It
- Vehicle Type Variations for HGV Trailer PSV and Van Checklists
- Planning Safety Inspections by ISO Week Frequency and Brake Evidence
- Retention Audit Evidence and Cross References to Related Compliance Records
- Quick Reference Downloadable Checklist Sample Entries and Platform Workflow
Introduction to the Safety Inspection Checklist as a Compliance Control
A transport manager preparing for a DVSA visit often starts with the maintenance file, not the checklist itself. The examiner may ask for inspection records, defect reports, rectification evidence, brake test results and the calendar showing why inspections fell when they did. The checklist becomes valuable only when those records agree.
The DVSA Guide to Maintaining Roadworthiness distinguishes between daily walkaround checks and scheduled safety inspections. At least one walkaround check should be completed in every 24-hour period that a vehicle is in service, while safety inspections normally fall within an evidence-based interval of 4 to 13 weeks. Those are different controls, with different users and different purposes.
A driver's walkaround is a pre-use legal control. It should identify visible or readily detectable defects before the vehicle is used. The scheduled safety inspection is a deeper, planned examination covering safety-critical systems, fitted equipment and the maintenance history that supports continued operation.
Practical rule: A tick proves very little unless the record identifies the vehicle, the person checking it, the date, the result and the action taken on defects.
What good evidence looks like
A defensible file normally connects:
- Vehicle identity: Registration, trailer identification where relevant, mileage or other useful operational context.
- Inspection timing: Due date, completed date, ISO week and any reason for a change.
- Inspection scope: The checks relevant to that HGV, trailer, van or PSV.
- Defect handling: A clear description, severity, decision, repair and return-to-service sign-off.
- Brake evidence: Performance assessment or a documented risk assessment where a laden test wasn't completed.
- Cross references: Walkaround reports, job cards, brake prints, photographs and monthly compliance reviews.
Weather can also affect how operators plan daily vehicle use and driver communication. For teams building a broader operational control around changing conditions, this resource on upgrading fleet safety with weather data offers useful context. It doesn't replace the roadworthiness process, but it can support sensible route and driver planning.
The checklist should be usable at the roadside, in the workshop and during a Traffic Commissioner review. It shouldn't be a generic form copied across every vehicle type. A mixed fleet needs a controlled core with clearly marked vehicle-specific items, otherwise an apparently complete record can still omit the hazard that matters.
Legal Requirements Guidance and Best Practice Behind the Checklist
A vehicle arrives for an inspection with a brake concern, a recent driver defect report and an incomplete job card. The checklist must let a transport manager show what was checked, which standard applied, who made the decision and whether the vehicle was safe to return to service.
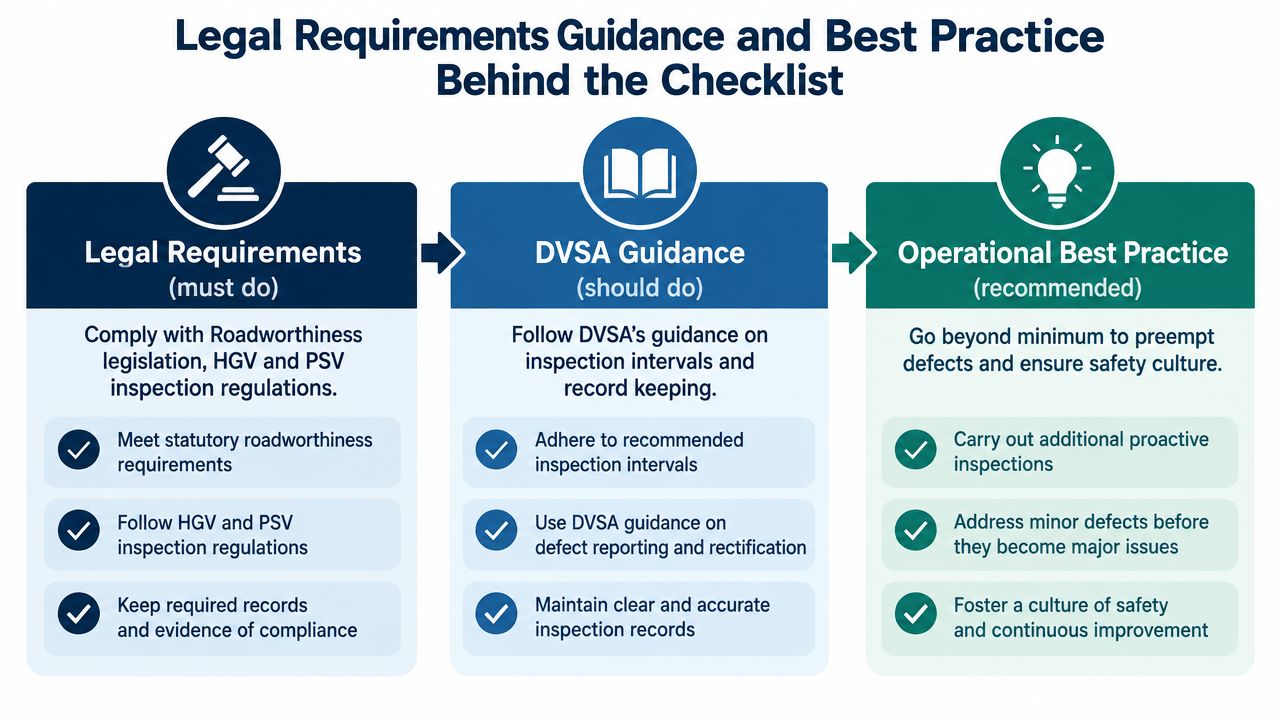
Three layers shape that control. Roadworthiness law and operator licence undertakings create the duty to keep vehicles fit and serviceable. The DVSA Guide to Maintaining Roadworthiness explains how operators can organise the maintenance system. Internal best practice adds consistent review points and evidence that may exceed the law's minimum wording (DVSA roadworthiness guidance history).
That distinction matters at public inquiry. A form should not present every field as a separate statutory requirement. The operator should, however, be able to explain why those fields form part of its adopted maintenance system and how the records are reviewed.
Inspection frequency should reflect operating conditions, annual mileage, manufacturer recommendations and risks that could make a vehicle unroadworthy. The referenced DVSA guidance gives a practical interval band of 4 to 13 weeks, with older vehicles and trailers requiring tighter control. Vehicles and trailers aged 12 years or older have a stated minimum 6-week inspection frequency.
Brake evidence now needs a defined place in the workflow. The April 2025 DVSA guidance says every safety inspection should include a brake performance assessment. Where a laden test has not been completed, record a justified risk assessment. Do not leave a blank field that gives no indication whether the test was missed, unsuitable or considered unnecessary (current DVSA roadworthiness guidance).
The record must show control, not just completion
A pass or fail box is only the starting point. The record should define the inspection scope, describe defects precisely and show the next action. “Brakes checked, OK” provides little evidence. A stronger entry records the test method, result, related brake print and any follow-up work.
Drivers' defect reports, rectification records, safety inspection records and repair work records must be retained for at least 15 months as part of the vehicle maintenance history (DVSA retention guidance). Retention makes the checklist part of a connected evidence system, alongside walkaround reports, workshop records and platform audit trails.
Give each exception an owner and status. A defect should show whether it remains open, has been authorised for restricted use, repaired, verified or otherwise explained. If the vehicle was off the road, record that position clearly so the platform does not show an unexplained inspection gap.
Safety Inspection Checklist Categories at a Glance
A checklist works better when the categories match the way an inspector thinks about the vehicle. The driver needs a quick walkaround. The workshop needs sufficient depth to examine components and record measurements. The transport manager needs a structure that makes overdue items, repeat defects and missing evidence easy to find.
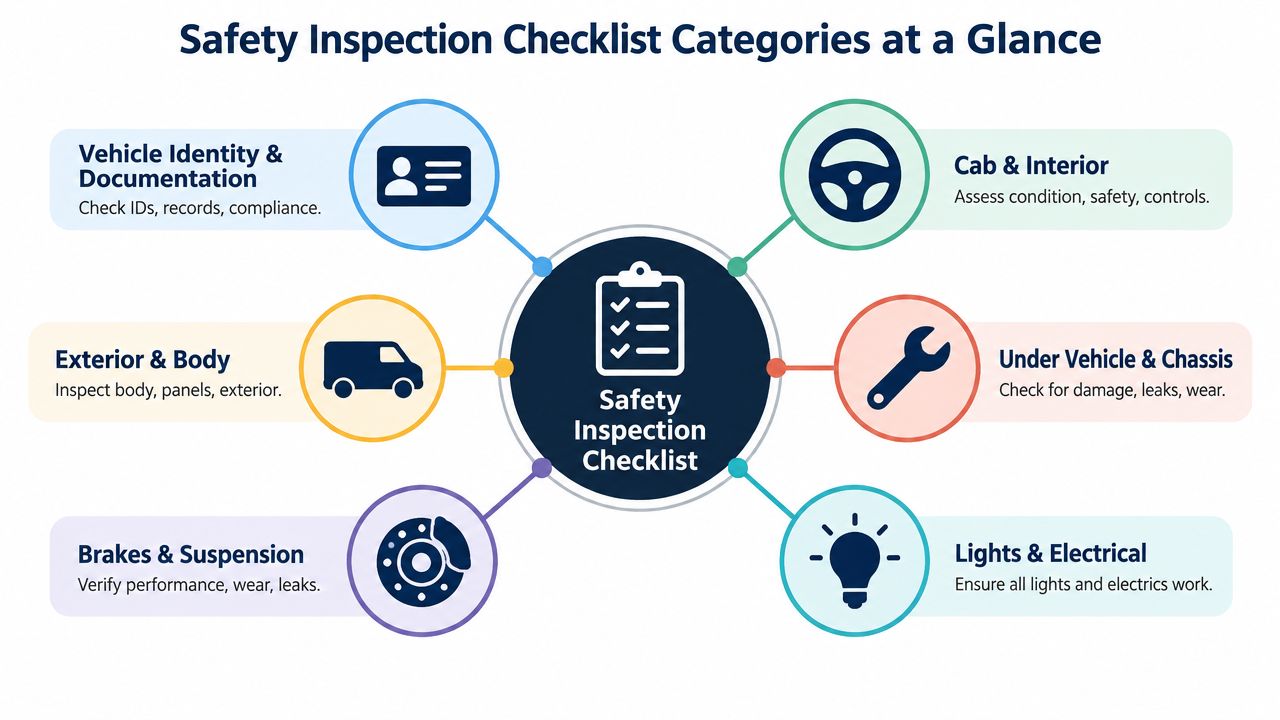
Use the following taxonomy as the core of the form, then switch items on or off by vehicle type and equipment fitted.
Identity and control information
Start with the vehicle registration or trailer identifier, inspection date, inspector, mileage where used by your process, inspection location and vehicle status. Include the due date and the scheduled ISO week so a reviewer can see whether the inspection was completed within the planned control.
Documentation checks should confirm that the correct vehicle file is being used and that relevant test, tax, insurance, maintenance and defect records can be matched. The form shouldn't ask a fitter to certify something outside their role, such as a driver licence entitlement. That belongs in the driver compliance workflow.
Cab, driver controls and visibility
Cover the driver's view, windscreen, mirrors, wipers, washers, warning lamps, horn, seat and seatbelt condition. A PSV version should also identify passenger-facing controls and emergency equipment relevant to that vehicle.
Steering, suspension, brakes and wheels
These are core mechanical categories. Include steering play, joints, suspension components, air systems, brake condition, brake performance, wheels, nuts, tyres, tread and pressure. The form should provide space for measurements, test references and photographs where those records support the finding.
Body, chassis, coupling and electrical systems
Inspect the chassis and body for damage, corrosion or insecure components. For articulated and drawbar combinations, include coupling, fifth-wheel, kingpin, landing legs, air and electrical connections. Lights, indicators, reflectors, marker lamps and warning systems need a clear functional result.
Ancillary equipment and load security
Tail-lifts, body equipment, access steps, curtains, doors, ramps and load restraint equipment should appear where fitted. DVSA's walkaround guidance specifically highlights items such as load security and tail-lifts, so a generic mechanical form shouldn't hide them under “bodywork”.
Exhaust, emissions and vehicle-specific risks
Record visible exhaust damage, leaks and emissions-related warning signs within the appropriate inspection scope. Then add the items that belong only to the vehicle or operation, including trailer equipment, PSV emergency exits and passenger seating or seatbelts.
The important design choice is to avoid one enormous form that everyone rushes through. A shorter, relevant form produces better evidence than a long list containing irrelevant checks and no room for meaningful findings.
Detailed Checklist Entries With What to Check and How to Record It
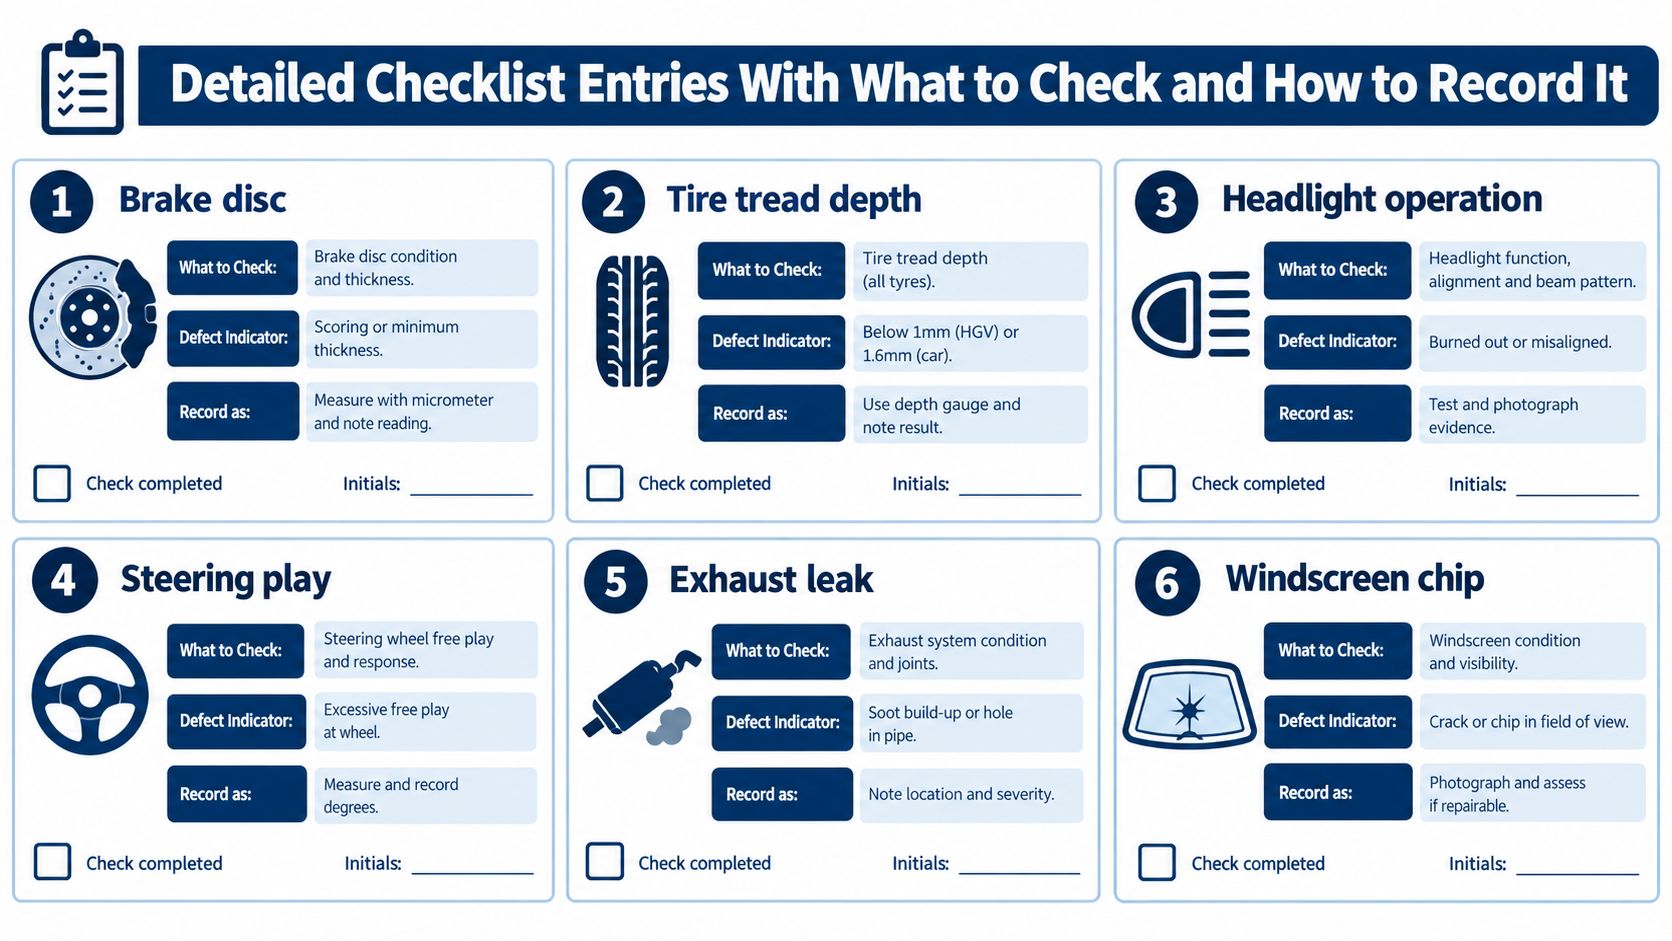
Each line should tell the inspector what to examine and tell the reviewer what evidence is expected. Avoid entries such as “vehicle checked” or “all OK”. They create uncertainty about scope and make it difficult to compare a defect report with the later repair.
Brake system and performance
Inspect service and parking brake operation, air or hydraulic components, pipes, hoses, chambers, discs, drums, linings and warning systems. Look for leaks, damage, contamination, abnormal wear and any evidence that braking performance may have deteriorated.
The record should state how performance was assessed, identify the equipment or test reference where available and attach the brake print or measured result. If the laden test wasn't completed, record the risk assessment and its justification. A bare “brakes passed” entry doesn't explain the evidence behind the decision.
Steering and suspension
Check steering wheel free play, joints, linkages, power assistance, suspension mountings, springs, air bags, dampers and ride-height concerns. Record the location of any wear, movement, leak or damage, rather than writing “steering defect”.
Use a clear action line. For example, “nearside front steering joint movement identified, vehicle held pending replacement, rechecked by named inspector” gives continuity from finding to release.
Wheels and tyres
Inspect tyre condition, inflation, visible damage, valve security, wheel fixings and compatibility with the vehicle's use. Record the position of the affected tyre and the measured result where a gauge or other equipment is used. Photographs can support the entry, but they don't replace a written decision.
Lights, reflectors and electrical equipment
Test headlamps, indicators, brake lamps, rear lamps, marker lamps, hazard warning lights, reflectors and relevant dashboard warnings. Record which lamp failed and whether it was replaced, repaired or referred for further work.
Body, chassis, load and ancillary equipment
Examine body panels, doors, curtains, floors, steps, guards, exhaust, chassis members and visible fasteners. For load-carrying equipment, record the condition of restraint points and the availability or serviceability of the equipment used to secure the load.
Tail-lifts need their own functional entry w
safety inspection checklistDVSA roadworthinessfleet compliance UKPMI planningoperator licence